CI / CD Workflow for a Rails + Docker app
01 Jan 2020Now that we’re familiar with the basics of how to pull data from the Oura Cloud, we’re going to turn up the volume and create a deployment pipeline to host our app as a cloud service. This is an overview on building a CI / CD Workflow using Docker + Rails + PostgreSQL + GitLab CI/CD + DigitalOcean.
Repo: https://gitlab.com/mindatasleep/oura

Introduction
Lately I’ve been building Continuous Integration pipelines to deploy apps to the cloud using Docker and GitLab. CI/CD (Continuous Integration/Continuous Delivery) is a methodology to streamline software development with automation. Changes to the code base trigger new builds which are tested and deployed to target environments in a repeatable and automated fashion. This makes it easy for teams to release fully functional builds into production.
I found online walkthroughs on integrating the diverse tools needed to build applications can be fragmented - complicating onboarding for those starting out. Some guides are poorly written, others lead readers to dead ends with no concrete use-case, and others simply become outdated and not applicable to the latest versions of the technologies.
This is a start-to-finish walkthrough on how to assemble and deploy a Ruby on Rails (6.0.2) application on the cloud provider DigitalOcean using Docker and GitLab CI/CD. Both the application and its PostgreSQL database are coordinated by docker-compose inside a Docker engine that lives in a DigitalOcean virtual environment called a “droplet”. To give it a real-world use-case, the app pulls data from the Oura Ring Sleep tracker API and visualizes it with Python libraries.
As alluded to by the title, this walkthrough involves the interfacing of several components. Ambitious? Maybe. Overkill? No: these are the systems thinking and DevAps skills needed to work across teams. For the sake of crisp prose and cognitive respite I’ll stroke broad through some concepts and reference select documentation that go deeper into the theory.
One more thing. I noticed some online guides sprint through nightmarish successions of spiderweb code snippets. It’s rather impolite to march readers through a phalanx of code only strand them in the middle of landmines, bugs, or compatibility errors. We’ll do sanity checks and run boilerplate sample code so you can make sure things are run properly before portering over the more complex, and so you can feel comfortable diving deeper into the different possible avenues. You’re in good hands.
Let’s get started.
Walkthrough
DigitalOcean is a cloud infrastructure provider where apps live. It’s like AWS but without runaway prices or the cacophony of services named after funk bands and fairytales. It’s cheap, minimalist, and has fixed predictable pricing. You can use my referral link to get $100 credit which should get you through this guide and beyond.
We’re first going to set up a development environment and version control so that pushing the main branch to a repo on GitLab triggers a build on a DigitalOcean virtual machine.
1. Create a virtual machine with Docker on DigitalOcean
DigitalOcean droplets are Linux-based cloud servers which will hold the Docker containers running our app. Droplets can be created though the web portal but, since we’re wearing big-boy pants today, we are doing it through the local command line. doctl is the DigitalOcean command-line client that you can run from your local terminal. Read here for installation and nuances of doctl.
1.1 Create a DigitalOcean project, generate a Personal Access Token, and log into doctl
First, create a project on DigitalOcean and generate a token on your DigitalOcean API control panel. See the DigitalOcean API guide for reference. The token is a credential to log into the doctl CLI from your terminal. Set it as an environmental variable on your terminal and keep it somewhere handy since it’ll only be shown once.
export DO_TOKEN='b946ecbba6d2de66ba...089f63e1ca7f4bf9d3ee'
Install doctl with brew install doctl, open your terminal authenticate with doctl auth init and enter your token when prompted, or run doctl auth init -t $DO_TOKEN.
1.2 Create a Docker droplet
With DO_TOKEN you can now execute the following in your terminal to create a DigitalOcean resource. The droplet has a docker-18-04 image installed on Ubuntu, and the working name for this example is foxradish. Freely set your own name here.
curl -X POST -H 'Content-Type: application/json' -H 'Authorization: Bearer '$DO_TOKEN'' -d '{"name":"foxradish", "region":"sfo2", "size":"s-2vcpu-4gb", "image":"docker-18-04"}' "https://api.digitalocean.com/v2/droplets"
The droplet should appear in your DigitalOcean control panel.
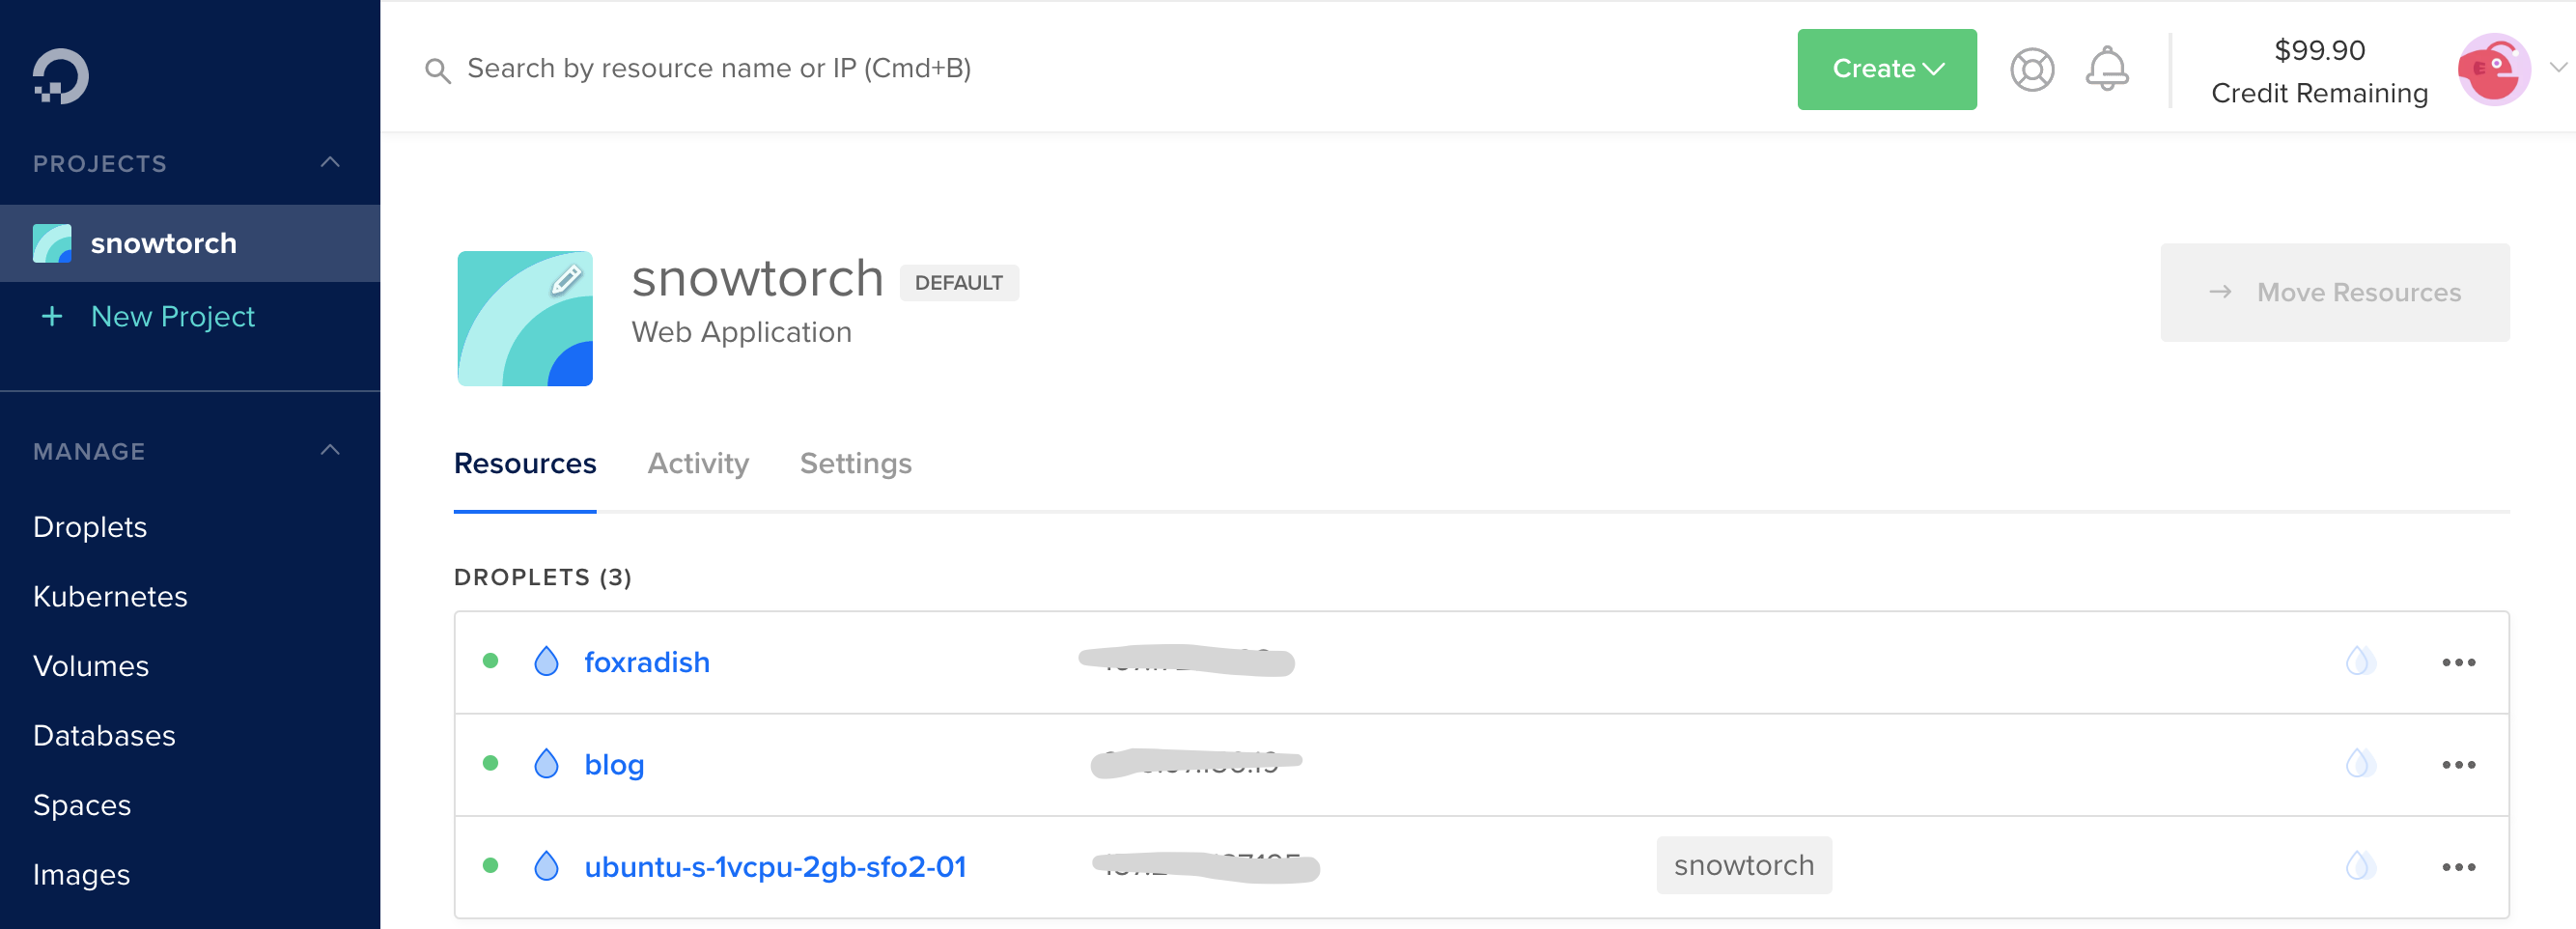 . From here you can inspect and modify the droplet. This is where the droplet’s IP address appears. The IP is the URL to access the app from a browser. You can map a domain name to the IP to set a custom URL.
Check its status with.
curl -H 'Content-Type: application/json' -H 'Authorization: Bearer '$DO_TOKEN'' "https://api.digitalocean.com/v2/droplets?name=foxradish"
The doctl compute command manages the container infrastructure within the droplet. Try it out:
# List droplets
doctl compute droplet list --format "ID,Name,PublicIPv4"
# Inspect droplet by id
doctl compute droplet get droplet_id --output json
You’ll receive an email with a notification that the droplet has been generated and a one-time password. Head to the droplet’s console with doctl compute ssh foxradish and follow the prompt to set a new password. The default user-name is root. Note that DigitalOcean provides a browser-based console from which to access droplets, but it’s janky.
You should be in a shell console from which you can run commands within the droplet’s environment. Notice the root@foxradish:~# preface.
To begin, run docker container ls which should show that there are currently no active containers. The droplet is currently empty and in the next steps we’ll create containers in it via GitLab. Also notice you just ran a docker command, which implies that Docker Engine is operating within the droplet.
Run exit to exit.
1.3 [OPTIONAL] Create a PostgreSQL droplet
To keep boilerplate setup simple, we’ll create a PostgreSQL database with Docker in the same droplet as the app. However, keeping a database on a separate droplet is prudent and grants dexterity over how you connect to it with tools beyond this app. For reference, here’s how to create a new droplet with a PostgreSQL database:
curl -X POST -H 'Content-Type: application/json' -H 'Authorization: Bearer '$DO_TOKEN'' -d '{"name":"postgresql-db", "region":"sfo2", "engine":"pg", "version":"11", "size":"db-s-2vcpu-4gb", "num_nodes":1}' "https://api.digitalocean.com/v2/databases"
Check the status and the connection information. You’ll save some of these as environmental variables in GitLab in order to keep their values hidden and away from the file directory.
curl -H 'Content-Type: application/json' -H 'Authorization: Bearer '$DO_TOKEN'' "https://api.digitalocean.com/v2/databases?name=postgresql-db" | jq '.databases[0].connection'
Response:
{
  "protocol": "postgresql",
  "uri": "postgresql://doadmin:a...axznl4k@postgresql-db-do-user-7024309-0.db.ondigitalocean.com:25060/defaultdb?sslmode=require",
  "database": "defaultdb",
  "host": "postgresql-db-do-user-7024309-0.db.ondigitalocean.com",
  "port": 25060,
  "user": "doadmin",
  "password": "z1wb...znl4k",
  "ssl": true
}
To connect to this database, you would set them in the app’s database configuration. They’d exist as environmental variables on the GitLab to keep them hidden.
BONUS: Sanity check
This section is a brief optional branchaway from the walkthrough to provide a sanity check and to get your feet wet with running commands on the droplet’s shell. We’ll create a Hello World container to check that everything is running then delete it.
Bash back into the container with doctl compute ssh foxradish and create a simple Docker container with:
docker run -itd --rm -p 8000:80 --name testweb kitematic/hello-world-nginx
Now when you run docker container ls you should see it come up. It’s running on port 8000.
Your droplet’s IP address appears on its DigitalOcean Control Panel. When you visit port 8000 of that IP on your browser you should see a congratulatory message from the nginx container you just created. Victory! Now remove the container with docker container kill testweb; we’re going for bigger game. If you refresh the browser, you’ll notice the page is now down.
2. Configure SSH access to your DigitalOcean droplet
The SSH protocol uses public key cryptography for authenticating hosts and users. The authentication keys, called SSH keys, are created using the keygen program. ssh-keygen is a tool for creating new authentication key pairs for SSH. You’ll create a public - private key pair, and store the public key in the droplet and the private key as variable in your repo’s GitLab CI/CI environment. This will grant permission for GitLab to execute commands in the Droplet that create the app’s Docker containers.
Here are the instructions to Upload an SSH Public Key to an Existing Droplet. I used the 2nd method: From your local computer by piping the contents of the key into the ~/.ssh/authorized_keys file. I personally had trouble *SSHing to the Droplet and adding the public key manually when using the browser console - the jankyness of the console would switch characters when pasting the key.
2.1 Generate SSH public and private keys
Run ssh-keygen and follow prompts to select a location for the keys. I recommend using the default locations and foregoing pass-phrases allows your SSH client to automatically find your SSH keys and authenticate. This creates a public and a private key, which you can inspect using cat ~/.ssh/id_rsa.pub and cat ~/.ssh/id_rsa respectively. To reiterate, you’ll add the public key to the droplet’s file structure, and keep the private key as a hidden environmental variable on GitLab. When GitLab’s CI/CD pipeline runs, it’ll do a secret handshake with the droplet to be granted access.
2.2 Pipe the public key into the droplet with SSH and Password-Based Access
Copy the public key to a file inside the droplet’s root directory by running cat ~/.ssh/id_rsa.pub | ssh root@64.227.88.162 "mkdir -p ~/.ssh && cat >> ~/.ssh/authorized_keys". Enter your droplet’s password if prompted.
3. Containerize a base Rails + PostgreSQL app
To recap, you created a DigitalOcean virtual machine with Docker Engine installed in it (and, optionally, another one with PostgreSQL installed). Now you’ll use Docker Compose to define and operate the Docker containers holding the app’s different modules. One of those containers will hold a Ruby on Rails app and will communicate with another container holding a PostgreSQL database. We’ll add other containers to add functionality to the app.
NOTE: If this seems complex note that you’ll gradually appreciate the beauty of Docker as these concepts take hold in your mind. This walkthrough does not go into Docker and images beyond minimum viable explanation. To learn more about Docker visit the docs, tread this summarized explanation, or listen to *TechLead* ramble about Docker while he sips tea and reminds you he’s a millionaire.
3.1 Create a Rails app
Open a terminal to ceate a boilerplate Rails app in a new directory and pack it in a Docker container (I’m using Rails 6.0.2.1 and ruby 2.7.0). docker-compose will create a container from that app’s Dockerfile and code, and another container from a pre-built PostgreSQL image.
mkdir snowtorch-oura && cd snowtorch-oura
rails new webapp --database=postgresql
cd webapp
bundle install
rails webpacker:install
cd ..
3.2 Create a Dockerfile
Docker builds images automatically by reading instructions from a Dockerfile, which is a recipe with the succession of commands a user could call on the command line to assemble an application module or service.
A Docker image is built from a series of instructions (layers) described in the Dockerfile.
In this Dockerfile, the FROM statement starts out by creating a layer from the ruby:2.6.5 image. RUN executes commands to install and update packages. WORKDIR defines the active directory of a Docker container to execute subsequent commands for. The COPY command passes files from the client’s current directory over to the container. ENTRYPOINT specifies what executable to run when the container starts which, in this case, a file with instructions. EXPOSE defines which ports are intended to be published. Finally, the last layer, CMD, specifies what command to run within the container. Again, these are broad strokes on topics you should feel comfortable with before moving forward.
# snowtorch-oura/webapp/Dockerfile
FROM ruby:2.6.5

RUN apt-get update -qq && apt-get install -y nodejs postgresql-client

WORKDIR /myapp
COPY Gemfile Gemfile.lock /myapp/
RUN gem install bundler && bundle install --jobs 20 --retry 5
COPY . /myapp/

# Add a script to be executed every time the container starts.
COPY entrypoint.sh /usr/bin/
RUN chmod +x /usr/bin/entrypoint.sh
ENTRYPOINT ["entrypoint.sh"]
EXPOSE 3000

CMD ["rails", "server", "-b", "0.0.0.0"]
3.3 Define the entrypoint.sh file
The ENTRYPOINT instruction works similarly to CMD in that it specifies the command to execute when the container is started. However, doesn’t allow a user to override the command. Instead, anything added to the end of the docker run command is appended to the entrypoint. It’s useful for tucking away preliminary commands. In this case, we use it ensure the server is started without a potentially-conflicting file in the directory.
The Dockerfile file above incorporates an entrypoint file to be executed every time the container starts. Its copied, granted access permissions (with RUN chmod +x), and referenced so it executes prior to the command specified by CMD. Create snowtorch-oura/webapp/entrypoint.sh with the following code:
#!/bin/bash
set -e

# Remove a potentially pre-existing server.pid for Rails.
rm -f /myapp/tmp/pids/server.pid

# Then exec the container's main process (what's set as CMD in the Dockerfile).
exec "$@"
3.4 Configure the Rails app to link to the PostgreSQL database
Configure the the Rails app to use PostgreSQL as its database by adding a few lines of snowtorch/webapp/config/database.yml. Replace the file’s contents with:
# snowtorch/webapp/config/database.yml
default: &default
  adapter: postgresql
  encoding: unicode
  host: db
  pool: <%= ENV.fetch("RAILS_MAX_THREADS") { 5 } %>
  username: postgres
  password:

development:
  <<: *default
  database: webapp_development

test:
  <<: *default
  database: webapp_test

production:
  <<: *default
  database: webapp_production
  username: webapp
  password: <%= ENV['WEBAPP_DATABASE_PASSWORD'] %>
Note: If you decide to use a different database, such as one in a separate PostgreSQL as described in the optional step above, you’d enter its credentials and details here.
3.5 Create the docker-compose file
Compose is a tool to define and run multi-container Docker applications. The application and its services are defined in YAML file named docker-compose.yml.
Createsnowtorch-oura/docker-compose.yml. Notice the 2 services it creates on individual containers. Theweb image is built from the Dockerfile referenced by ./webapp, and db from a postgres:11 image. The db container is accessed by web with the configuration provided in database.yml. Note: Set up db accordingly if you choose to use a different database.
version: '3.7'
services:
    web:
        build: ./webapp
        command: bash -c "rm -f tmp/pids/server.pid && bundle exec rails s -p 3000 -b '0.0.0.0'"
        volumes:
            -  ./webapp:/myapp
        ports:
            - "3000:3000"
        depends_on:
            - db
    db:
        image: postgres:11
        volumes:
            - db-data:/var/lib/postgresql/data
volumes:
    db-data: {}
Test that docker-compose successfully runs by running docker-compose up --build from the snowtorch-oura/ directory. Depending on your rails setup
I some times get a yarn: not found error, which I circumvent by changing to false every instance of check_yarn_integrity: false within the webapp/config/webpacker.yml file, as indicated in the error log.
While the app runs locally, instantiate and migrate the database by running docker container exec -it snowtorch_web_1 rails db:create db:migrate on a different terminal on the same directory.
If things run correctly, you should be able to visit http://0.0.0.0:3000/ on your browser and see the stock “Yay! You’re on Rails!” screen. We’ll get to making this pretty and functional in a later step.
First, let’s pop it onto the cloud.
The app’s cloud environment will need access to environmental variables and cacheing services not available in your local environment. As such, you’ll create a separate Docker Compose file to run in your droplet: snowtorch-oura/docker-compose.ci.yml.
version: '3.7'
services:
    web:
        build:
            context: ./webapp
            dockerfile: Dockerfile
            cache_from:
                - "${WEB_IMAGE}"
        image: "${WEB_IMAGE}"
        command: bash -c "rm -f tmp/pids/server.pid && bundle exec rails s -p 3000 -b '0.0.0.0'"
        volumes:
            -  ./webapp:/myapp
        ports:
            - "3000:3000"
        env_file: .env
        depends_on:
            - db
    db:
        image: postgres:11.1
        volumes:
            - db-data:/var/lib/postgresql/data
volumes:
    db-data: {}
4. Link GitLab CI/CD to DigitalOcean
GitLab is a source code management platform with a CI/CD pipeline. Useful for working with teams and to keep the code base from going bonkers. It checks that pushes to the code base don’t have errors, and automatically deploys code to the environments it needs to go. We’re going to connect it to a DigitalOcean instance so every git push gets deployed. Before beginning, you should read up on how to Set Up CI Pipelines with GitLab CI on DigitalOcean to get an overview.
GitLab CI/CD pipelines are configured using a YAML file called .gitlab-ci.yml within each project’s root directory which GitLab runners automatically recognize and run (Note: .yml, not .yaml is recognized). This file defines the structure and order of commands to run in the pipeline each time you push. To use GitLab CI/CD, all you need to push your Git repo and for your stages and scripts to be specified in .gitlab-ci.yml.
There’s a world to learn here but for now keep in mind that there are stages with a number of jobs within each. The names of stages are arbitrary (convention is to use build, test, and deploy) and they are executed in the order they’re listed. To visualize the process, imagine that all the scripts on the configuration file are the same as the commands you run on a terminal on your computer.
4.1 Check-in your work and link it to a new GitLab repo
Create a new project on GitLab and push your code to it. For this, first create the following files with touch README.md .gitignore .gitlab-ci.yml setup_env.sh, instantiate git with git init and commit your work, add your repo as a remote with git remote add origin git@gitlab.com:<YOUR_USERNAME>/<YOUR_REPO_NAME>.git, and push your work. Before that, for hygiene, you may want to add the following to the .gitignore file on the root directory.
# .gitignore
*/.venv
*.pyc
*.idea
tmp/
GitLab recognizes .gitlab-ci.yml and new pushes trigger a new CI run. If no runners are available, the CI run will set to “pending”. Before we define a runner, let’s trigger a CI run to see what a job looks like in the pending state. Once a runner is available, it will immediately pick up the pending run.
Run the remote add, commit, and push sequence:
# Add your repo's remote
git remote add origin git@gitlab.com:<YOUR_USERNAME>/oura.git
# Commit and push code
git status # Make it a habit to always check what you're checking in.
git add .
git commit -m"First commit."
git push origin master
Explore the GitLab project’s repo and CI/CD pipeline at https://gitlab.com/YOUR_USERNAME/PROJECT_NAME.
4.2 Register a GitLab runner locally
Obtain a token for a shared or specific Runner through the GitLab portal and register it on your local terminal. See how, here.
export GITLAB_TOKEN="JnCis...roR8EE"
sudo gitlab-runner register

sudo gitlab-runner register \
  --url "https://gitlab.example.com/" \
  --registration-token $GITLAB_TOKEN \
  --description "alpine:latest" \
  --executor "docker" \
  --docker-image alpine:latest \
  --docker-services postgres:latest
4.2 Configure environmental variables
You can pass custom environment variables - such as credentials - to keep them hidden and off the code base.
4.2.1 Set up variables on GitLab
On your GitLab repo head to settings > CI/CD > variables and set up the following environmental variables:
- DIGITAL_OCEAN_IP_ADDRESS
- PRIVATE_KEY
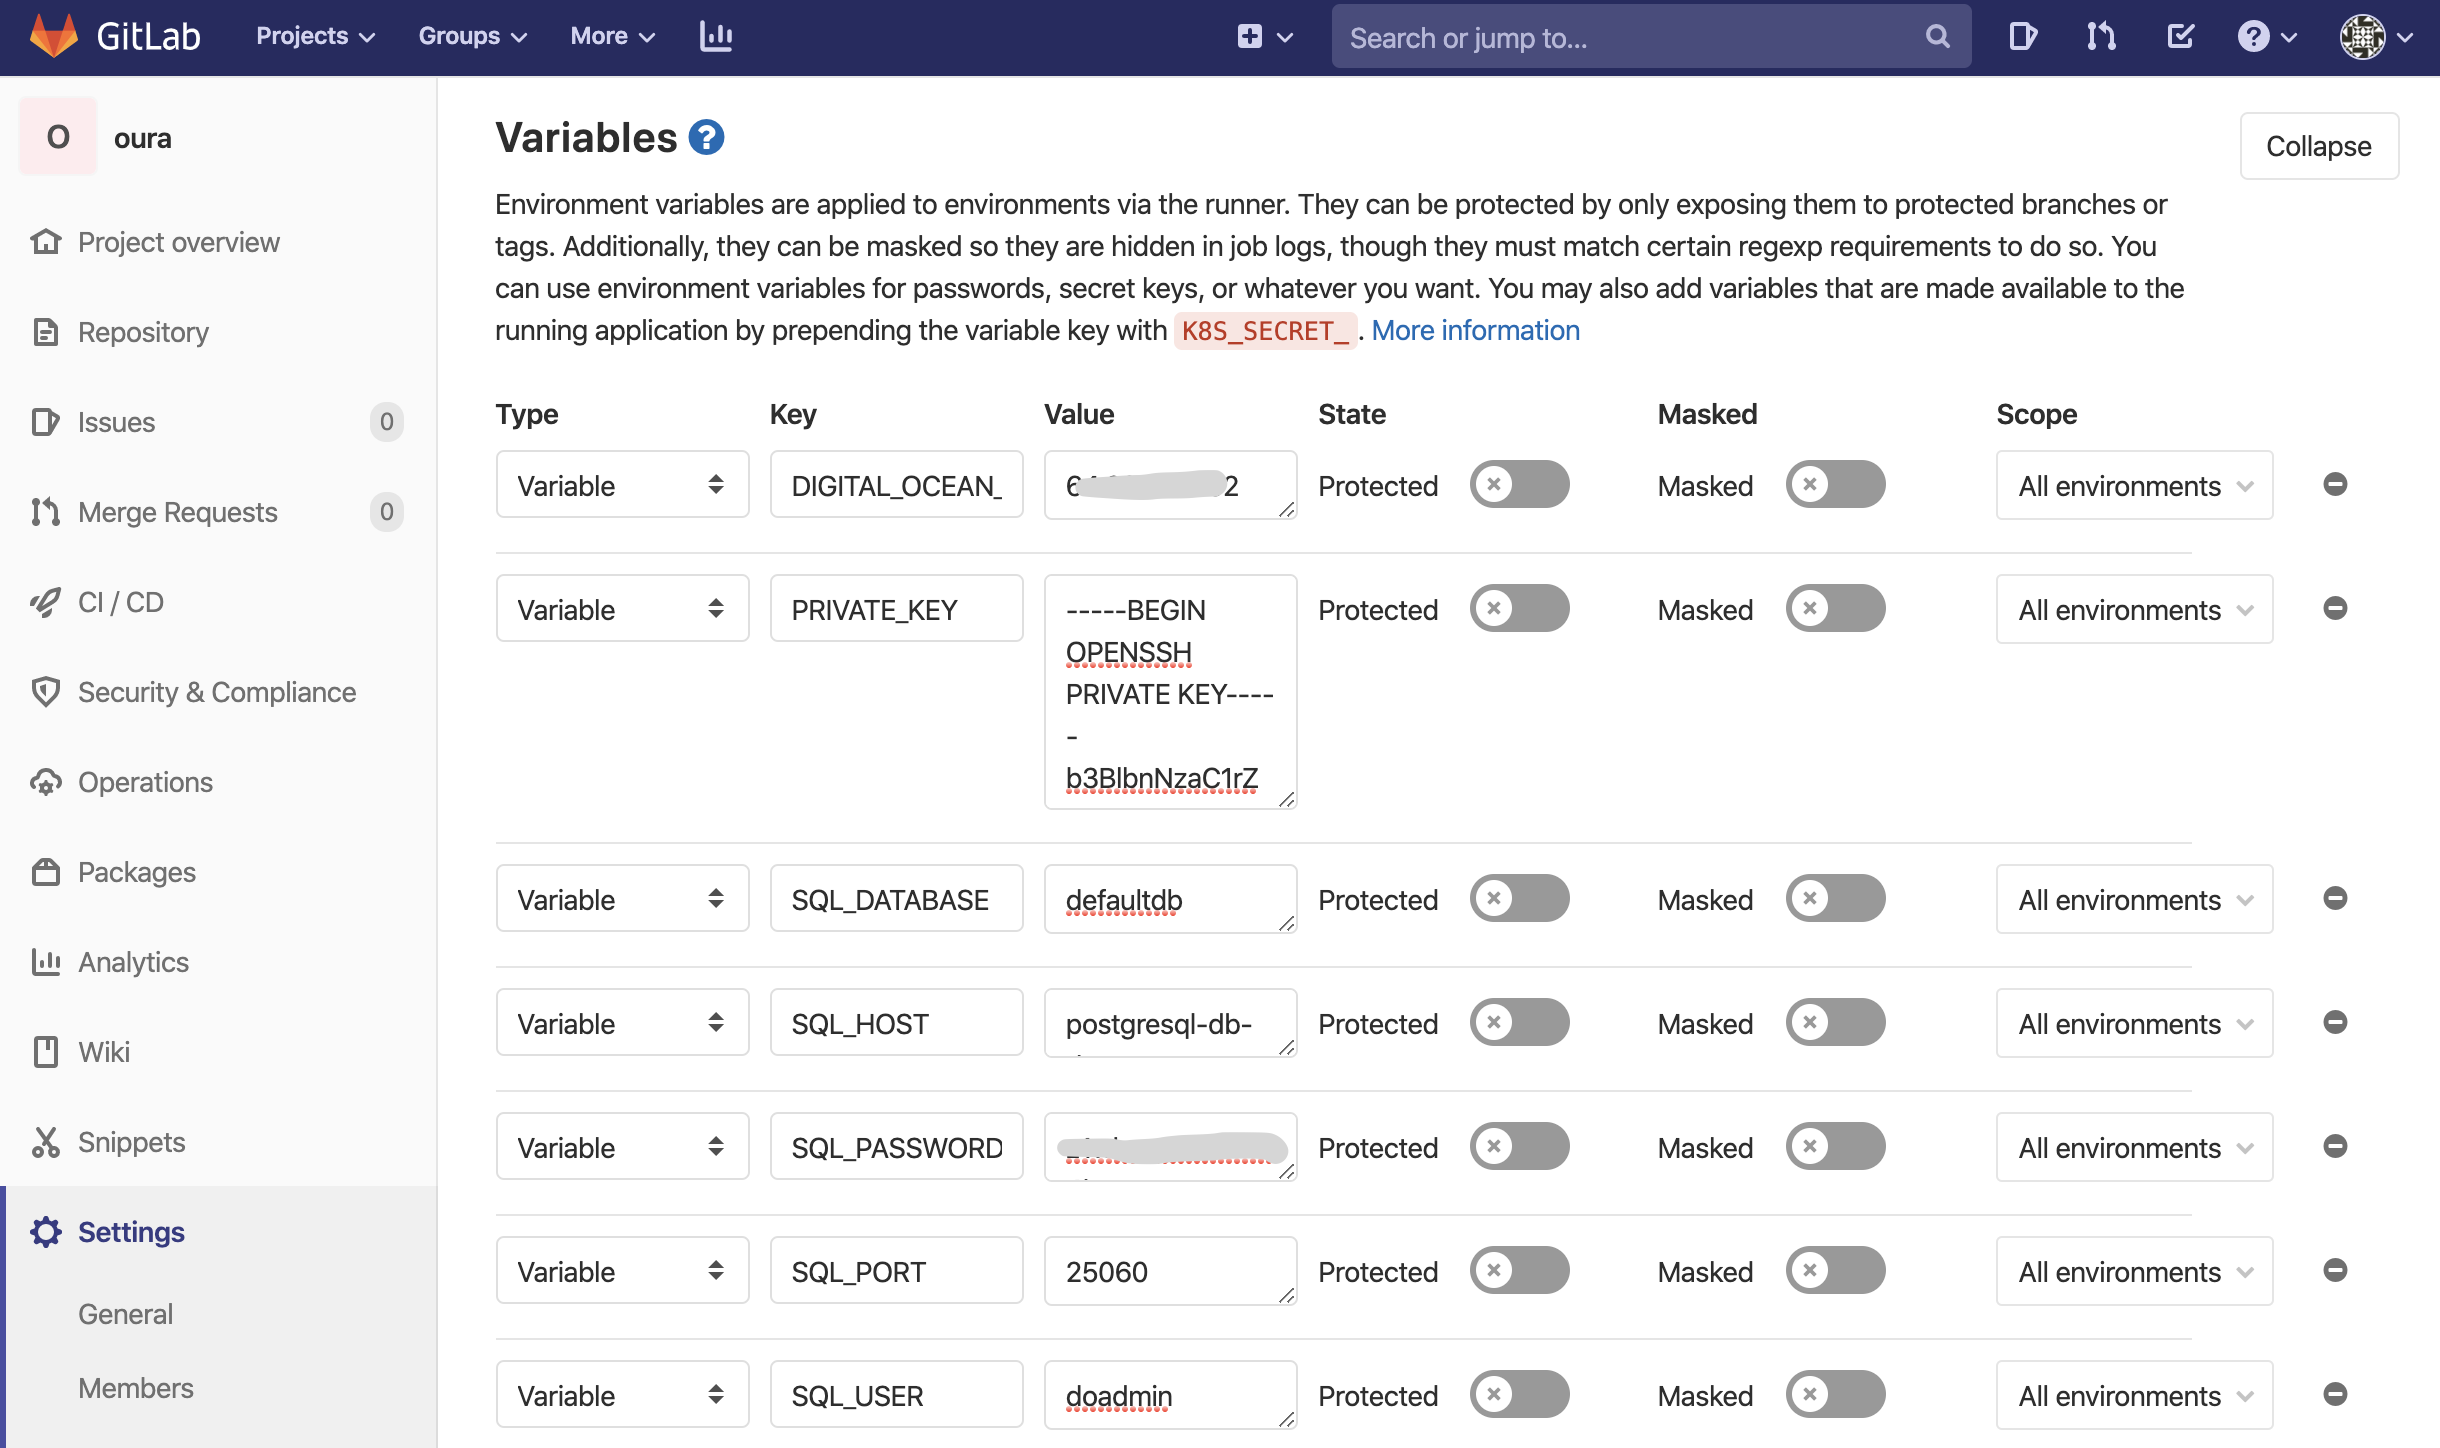
Look up your DIGITAL_OCEAN_IP_ADDRESS of the app’s droplet by running doctl compute droplet list --format "ID,Name,PublicIPv4". Retrieve the ssh PRIVATE_KEY by running cat ~/.ssh/id_rsa.
Optionally, if configuring an external database, add these too:
- SQL_DATABASE
- SQL_HOST
- SQL_PASSWORD
- SQL_PORT
- SQL_USER
Look up the values of the database’s SQL_ variables with curl -H 'Content-Type: application/json' -H 'Authorization: Bearer '$DO_TOKEN'' "https://api.digitalocean.com/v2/databases?name=postgresql-db" | jq '.databases[1].connection'.
4.2.2 Create a file to set environmental variables
On your app’s directory, create a file called setup_env.sh to pull the environment variables securely stored in the GitLab repo’s CI/CD settings into a file named .env. This is run by the command bash ./setup_env.sh in .gitlab-ci.yml.
# setup_env.sh

#!/bin/sh

echo WEB_IMAGE=$IMAGE:web  >> .env
echo CI_REGISTRY_USER=$CI_REGISTRY_USER   >> .env
echo CI_JOB_TOKEN=$CI_JOB_TOKEN  >> .env
echo CI_REGISTRY=$CI_REGISTRY  >> .env
echo IMAGE=$CI_REGISTRY/$CI_PROJECT_NAMESPACE/$CI_PROJECT_NAME >> .env
echo DEBUG=0 >> .env

# If configured to access a PostgreSQL on a different droplet
echo SQL_ENGINE=postgresql.db.backends.postgresql >> .env
echo DATABASE=postgres >> .env
echo SECRET_KEY=$SECRET_KEY >> .env
echo SQL_DATABASE=$SQL_DATABASE >> .env
echo SQL_USER=$SQL_USER >> .env
echo SQL_PASSWORD=$SQL_PASSWORD >> .env
echo SQL_HOST=$SQL_HOST >> .env
echo SQL_PORT=$SQL_PORT >> .env
4.3 Create .gitlab-ci.yml
Jobs are the most fundamental element of a GitLab CI/CD pipelines. Jobs are top-level elements with an arbitrary names and at least the script clause. They are defined with constraints stating under what conditions they should be executed. Runners pick up and execute jobs within the environment of the Runner.
With the Docker Container Registry integrated into GitLab, every project can have its own space to store its Docker images. With this in mind, the following configuration executes two stages: build to create and store images, and deploy to build and run containers with the images. A shared pre-build is defined in the before_script.
Notice how a Docker image and a docker-in-docker service are defined for all jobs during build time. Read more on building Docker images with GitLab CI/CD here.
image:
    name: docker/compose:1.24.1
    entrypoint: [""]

services:
    - docker:dind

cache:
    key: "$CI_JOB_STAGE-$CI_COMMIT_REF_SLUG"

stages:
    - build
    - deploy

variables:
    DOCKER_HOST: tcp://docker:2375
    DOCKER_DRIVER: overlay2

before_script:
    - export IMAGE=$CI_REGISTRY/$CI_PROJECT_NAMESPACE/$CI_PROJECT_NAME
    - export WEB_IMAGE=$IMAGE:web
    - apk add --no-cache openssh-client bash
    - chmod +x ./setup_env.sh
    - bash ./setup_env.sh
    - docker login -u $CI_REGISTRY_USER -p $CI_JOB_TOKEN $CI_REGISTRY

build:
    stage: build
    script:
        - docker pull $IMAGE:web || true
        - docker-compose -f docker-compose.ci.yml build
        - docker push $IMAGE:web
    except:
        - master

deploy:
    stage: deploy
    script:
        - mkdir -p ~/.ssh
        - echo "$PRIVATE_KEY" | tr -d '\r' > ~/.ssh/id_rsa
        - chmod 700 ~/.ssh/id_rsa
        - eval "$(ssh-agent -s)"
        - ssh-add ~/.ssh/id_rsa
        - ssh-keyscan -H 'gitlab.com' >> ~/.ssh/known_hosts
        - chmod +x ./deploy.sh
        - scp -o StrictHostKeyChecking=no -r webapp/ .env docker-compose.ci.yml root@$DIGITAL_OCEAN_IP_ADDRESS:/
        - bash ./deploy.sh
The deploy stage authenticates access to the DigitalOcean droplet using the private SSH key. eval $(ssh-agent -s) starts the ssh-agent and configures the environment (via eval) of the running shell to point to that agent. The agent holds the SSH keys.
4.4 Send it!
Push you code and watch the build logs of each job under the project’s CI/CD > Pipelines dashboard. If the jobs succeed, the app should be online an accessible at http://YOUR_DROPLET_IP:3000/
Congratulations, you now have a CI/CD pipeline that you can implement for this and other projects. Celebrate the small victories!
What’s next?
In the following walkthrough we’ll create a Rails app to interact with data from Oura Cloud.
To familiarize yourself with the Oura API, you can read the minimalist overview on connecting to the Oura Cloud API using Flask that I wrote a while back. For another perspective, here’s great guide written with the witty eloquence of Ismail Elouafiq. Certainly check out his other writings on human performance experiments and data science. His voice is a treat to read.